
Correct Hip Posture: How to Achieve Proper Hips Running Form
Learn how your pelvic position can create correct hip running posture and you'll avoid one of the most common running mistakes.

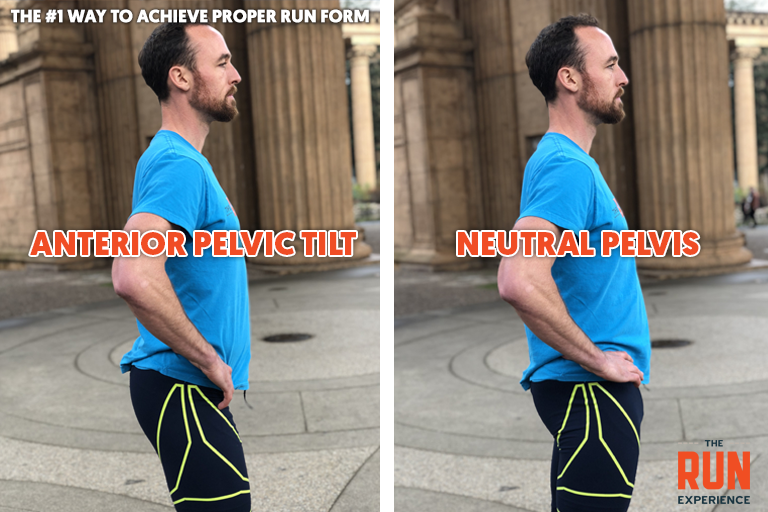
Today we’re talking about the number one running form mistake we see—an arched lower back. This position can lead to poor running hip posture, which is often the cause of low back pain, a low cadence, and potential running injuries. Fortunately, it’s not too difficult to build correct hip posture.
We’ll be diving into how to recognize this posture, and our favorite exercises to fix it.
Fix Your Running Form With Correct Hip Posture
As a runner, if you get injured or are struggling to make improvements in your performance, the most likely scapegoat is your feet. You’re encouraged to change your footstrike or get a different pair of shoes. But just because this is the common reaction doesn’t mean it’s the right one.
Rather than focusing on your feet, proper run form and injury prevention comes down to your running hip position—what are your hips and pelvis doing while on the run?
Briefly put, the body goes where the hips lead. As the center of your gravity, if you lean your hips to one side or the other, you’ll eventually have to pick up your feet to follow and prevent falling over. Similarly, if your hips are pressing forward, you’re creating forward momentum. Your feet will follow the forward lean your hips have started. This is obviously beneficial on the run since it means less work for you.
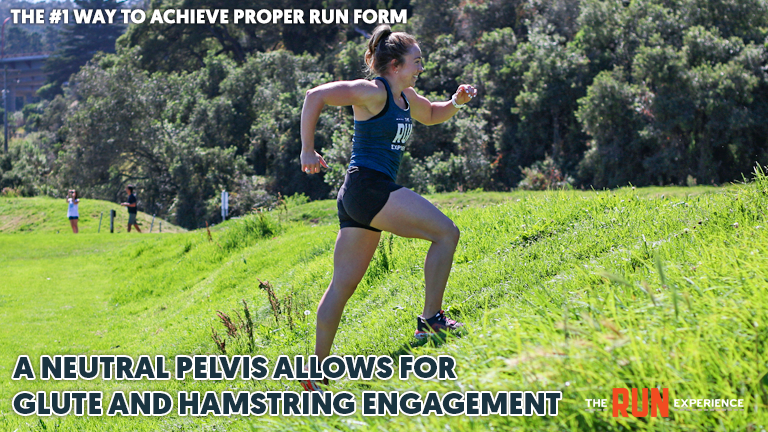
In addition to some energy benefits, your hip position can help avoid running injuries. We’ll get into the details below, but briefly put, if your pelvis is in a stable position, you’re better able to engage your glutes and hamstrings while running. As muscular powerhouses within the body, this helps avoid compensation injuries and muscle cramps. It also helps maintain good running technique.
Get To Know Your Pelvis (and Proper Hip Posture)
We’ll keep this anatomy lesson brief! Ideally, a runner has a “stacked” default position, say when they’re just standing around. This means standing up straight and able to trace a line starting with the ears down through the shoulders, hips, knees, and ankles.
Let’s look at the pelvis position within that straight line. Sometimes you can compare your pelvis to a bowl. The pelvis can be level, like a bowl sitting on a table. This is known as a neutral pelvis, and it really just means that your pelvis is balanced on all sides.
Alternatively, the pelvis can tilt forward or backward, like a bowl about to spill its contents. This can lead to either a tucked (tilted back) or extended (tilted forward) pelvis.
Forward Hip Posture
The extended pelvis is a very common posture seen in runners, where you would see an arched lower back if looking at them from the side. The technical term for this posture is anterior pelvic tilt, and it can be detrimental to your running hip posture.
Your running stride depends on a neutral, stable pelvis to allow your leg to fully extend behind you so it can pull forward into the next stride. An arched lower back compromises your hip extension and puts greater demand on the hip flexors to bring your leg forward.
Coach Nate digs into the energy return of hip extension in this video, along with a great demonstration using a big rubber band:
How to Adjust Your Hips for Proper Running Form
The hips play a vital role in maintaining alignment and facilitating powerful and efficient movements during a run. Below is a guide on how to adjust your hips to achieve proper running form.
A. Recognizing the Importance of Hip Positioning:
- Powerhouse of Movement: Understand that hips are central to producing forward propulsion in running.
- Alignment: Appreciate the role of hip alignment in ensuring a smooth kinetic chain from torso to toes.
B. Identifying Incorrect Hip Positioning:
Before making adjustments, identify and understand common hip misalignments:
- Anterior Pelvic Tilt: When the front of the pelvis drops and the back elevates.
- Posterior Pelvic Tilt: The opposite of anterior tilt; the front of the pelvis rises and the backdrops.
- Hip Drop: When one hip drops lower than the other, often noticeable when one leg is in the stance phase.
- Hip Hiking: Raising one hip higher, typically during the swing phase.
C. Techniques to Adjust Hip Positioning:
1. Engage the Core:
- Strengthen: Focus on building a strong core to assist in maintaining hip alignment.
- Activate: Ensure your core is active during running to stabilize the pelvis.
2. Mind the Pelvis:
- Neutral Pelvis: Aim for a neutral pelvis position, neither tilted forward nor backward.
- Pelvic Tilts: Practice pelvic tilts exercises to gain better control over pelvic movements.
3. Incorporate Strength Training:
- Glutes: Focus on exercises that build strength in the gluteal muscles.
- Hip Flexors: Ensure your hip flexors are strong and flexible.
4. Address Leg Length Discrepancy:
- Evaluation: Have a professional evaluate your leg lengths.
- Adjustment: Utilize potential shoe adjustments as per professional advice.
5. Optimize Hip Mobility:
- Dynamic Stretches: Include leg swings and circles to improve hip mobility.
- Yoga & Pilates: Engage in activities that promote hip flexibility and strength.
6. Focus on Symmetry:
- Mirror Work: Observe your hip movements and alignments in a mirror while jogging on the spot.
- Balance Exercises: Practice single-leg stands and movements to improve balance and hip stability.
7. Use of Technology:
- Gait Analysis: Consider undergoing a professional gait analysis to identify misalignments.
- Apps: Utilize applications that analyze and provide feedback on running form.
8. Leverage Running Drills:
- High Knees: To promote hip flexor strength and mobility.
- Butt Kicks: To enhance hamstring flexibility and recognize hip alignment.
9. Be Mindful:
- Body Awareness: Be conscious of your hip position throughout your run.
- Adjust in Real-Time: Make micro-adjustments as you run, ensuring optimal hip position.
D. Monitoring and Consistency:
- Continuous Check: Regularly assess and ensure your hips maintain an optimal position.
- Consistency: Ensure a consistent practice of exercises, mindfulness, and adjustments for long-term benefits.
E. Consult Professionals:
- Physical Therapists: To guide on specific exercises and adjustments tailored for you.
- Running Coaches: To assist with refining your overall running technique, including hip positioning.
3 Drills To Practice Correct Running Hip Posture
Try these quick drills to test your hip position and feel the difference between anterior and neutral pelvic tilt.
1. Standing Glute Engagement Drill
As you stand in the stacked straight line, engage your glutes by squeezing your butt. You should feel your hips drive forward as your pelvic locks into place.
On the other hand, if you let your back arch in that anterior pelvic tilt and then try to engage your glutes, it’s a lot tougher. Similarly, if you adopt a poor posture, say with one hip cocked to the side like you’re waiting in line at the grocery store, you’ll notice it’s much more difficult to engage your glutes and squeeze them on either leg.
Repeat this drill a few times to build awareness of the difference between a neutral and an anterior tilt.
2. Hollow Body Hold Drill
This drill will engage your core just as you practiced engaging your glutes. The stability in your core will help keep your pelvis away from that anterior tilt on the run, putting you in a much safer position while running.
- Lay on your back on the ground
- Bring your knees up to your chest
- Extend your arms out at your sides with palms facing up
- Press your low back strongly into the ground—you’ll feel the curve of your lumbar spine straighten out
While in this position, notice how pressing your low back into the ground locks your pelvis into the same neutral position we practiced with the butt squeeze. As you relax back down to the ground, you’ll feel the arch in your back return.
The arch in your back is a natural posture, so we’re not trying to get rid of that altogether. It’s the excessive arch, that anterior tilt, that we want to tone down by coming back to neutral.
Here’s how you can make the exercise more challenging:
Extra Challenge
- From the lying position with your back pressed firmly into the ground, extend a single leg out at a 45-degree angle, with your quads tight
- Extend the opposite arm out above your head
- Play with extending both legs or both arms, or arms and legs simultaneously to find the right amount of difficulty
The most important part of this drill is to keep your core engaged with a neutral pelvis. If your legs and arms are extended but your back is arched off the ground, you won’t get much out of this practice. If you’re feeling your back arch or losing integrity in your core by starting to relax those muscles, keep your knees close to your chest and your arms at your sides. You can slowly work up to extending just one arm, or just one leg and so on.
Don’t forget to BREATHE!
It can be very easy to hold your breath during this exercise as you concentrate on maintaining your form and core strength. We can’t hold our breath while running, so we definitely don’t want to hold it while performing a running drill!
Because of this, we recommend performing this exercise for 10 breath cycles rather than for time. One breath cycle is an inhale in and an exhale out. Step up the challenge by breathing exclusively through your nose for an extra dose of core and diaphragm engagement. To really dial in your running hip posture through this drill, practice it before and after your run for one week.
3. Running Awareness Drill
This final drill will tie together your hip position practice and how you should feel during your actual run. Practicing in isolation is a great start, but it’s important to also put it into practice while actually running.
- Start off with 10-20 running in place steps with an arched low back
- Think of your pelvis tipping forward in that anterior position.
- Next, squeeze your glutes and engage your core as you practiced during the first drill
- You should notice your hips drive forward as before, moving front anterior to neutral tilt.
The takeaway here is to think about running with your hips pressing forward as if your glutes were constantly engaged. That hip drive forward will keep your pelvis neutral and result in strong running hip posture. Changing your movement patterns will take time, so keep practicing these drills consistently and notice your improved run form.
For more information on how your hip posture can affect your running, watch this video on running faster with your hips:
Start Improving Those Hips
Correct hip posture leads to improved performance, and that’s the journey of every runner—to be better today than you were yesterday. Proper hip posture isn’t a destination. It’s a journey. You’ll need to continually practice this form and drills to keep everything fluid and moving the way it’s supposed to.
You can get even more information and workouts by downloading our mobile app!